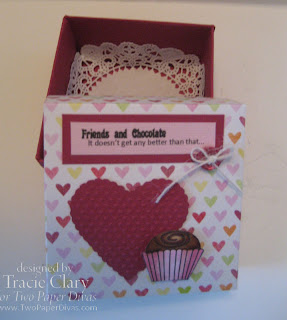
To make this box you will need to following:
1 12 x 12 inch piece cardstock for bottom of box
1 12 x 12 inch piece designer paper for top of box
It's All About Chocolate Digital Images from Two Paper Divas
Cut your piece of cardstock 9 inches x 9 inches. Score at 1 1/2 and 3 inches all the way around the square as shown below. Fold on all score lines.
Cut out 3 squares in each corner as indicated below.
Cut on each end to form a tab.
Fold up sides with tabs first.
Fold other sides over tabs. This will keep all the sides down very nicely.
Assemble the lid using the same process as above but cut your square 7 1/4 x 7 1/4 inches. Score at 1 and 2 inches all the way around the square. Follow the same directions as above for putting the top together.
And there you have a cute box. I usually put a doily in the inside of the box to give it a little decoration.
Decorate the box with embellishments like the digital images from Two Paper Divas.
Background
Sunday, January 29, 2012
Saturday, January 28, 2012
Two Paper Divas Truffle Image
Tis the season for chocolate, hearts and yummy things. I have been playing with the "It's All About Chocolate" Digital set from Two Paper Divas and having so much fun. Anyone who knows me knows how I do love my chocolate. I would exercise 8 hours a day for chocolate. Nothing could make me give it up.
Today's post is a chocolate box that I made to put my homemade chocolate truffles in for gifts. They are so yummy. I actually got the recipe from Oliva on "Oliva's Creative Quest". She was my secret sister one time on Splitcoast Stampers and we found out we had alot in common.
I thought I would be able to post a picture of the box with the truffles in them but I haven't got them made yet. So here is the empty box.
And here is the recipe.
Just in time for Valentine's Day. Be sure and check back tomorrow because I hope to post the instructions for the box. Who knows - I might even have truffles made. In the mean time - be sure and check out what Two Paper Divas are up to. They always have some great tutorials and images to purchase on their website.
I decided to enter this box in the Crafty Creations Challenge. It is anything but a card for kids so I am going to fill mine up with chocolates for one of my nieces or nephews or maybe all if I can get crackin and make a few more.
Friday, January 27, 2012
Prickley Pear Challenge
Today's card was made for the Prickley Pear Challenge using this sketch.
I had just recently received new designer paper pad called Six by Six by My Mind's Eye from my Secret Sister Card Kit Swap on Splitcoast Stampers. I love this set because it is pastels and I love pastels.
I also used the beautiful flowers dies and stamp set from Prickley Pear. I just love this set because you can use different stamps on the cut flowers to give them a different look.
The rick rack was done using a die from Papertrey Ink. This will make a nice birthday card.
Wednesday, January 25, 2012
Art Impressions Image
I made this card for the challenge over at SCS. I purchased the new Stella and Rose Designer Paper pad at Remember This Remember That and have decided that I have a new favorite designer paper. I also purchased the embellishments which adds an extra splash to the card.
This was a wonderful image to play with. You have to check out Art Impressions Stamps because they are the cutest and have such personality.
You can also see some of the other cards that were done using the image here. There are some very talented people in this group of women.
Monday, January 23, 2012
Sketch Saturday - Week #191 Challenge
This is the sketch challenge over at Sketch Saturday. Since I am working on valentine cards, I decided to use this sketch for my card. I used My Favorite Thing stamp "Jolinne - I Love You This Much" and colored her in with my copics. I was inspired by Denise over at The Paper Landscaper. Be sure and check out her blog because her coloring is fantastic and each of her cards have such personality.
I used my new punch that I purchased at Remember This. It is by Knock Outs and you can swap out the center piece for different punch borders.Of course I love the hearts. I also bought the pink heart ribbon which really made this card pop. The flowers are My Favorite Things die cuts. I think it is my favorite die right now.
I hope you enjoyed my card as much as I did. It was lots of fun to make. I will be sending this card to my parents.
Friday, January 20, 2012
Remember This Remember That
Today was a great day. I got to preview our new Local Scrapbooking Store. The name of the store is "Remember This Remember That" and is located in Gardner Kansas. It is just a hop and a skip from my house. The store is owned by Melissa Rodgers and her husband. Melissa is also part owner of Two Paper Divas. I was able to meet Melissa and Gayla of Two Paper Divas at the store and they are the nicest people you will ever meet.
Their store is so cute inside and they are carrying some fantastic products. I believe their opening will be the first weekend in February. For anyone local, you must check out their store.
Since they were nice enough to let me take a peek at their store, I decided to take them some goodies. I took a blueberry box that I had and decided to put some chocolate covered strawberries in them and decorate the box.
I started with wrapping the box with red ribbon and then decorating it as follows:
Large Spellbinder Scallop Circle
Red Heart Doily
White flower
My Favorite Things Mini Roses Die
Stampin Up Scallop circle punch
Chocolate covered strawberry digital image from Two Paper Divas
Friends and Chocolate Sentiment from Two Paper Divas
Embellishments
This made a fantastic package and I plan on making more. It is so much fun having a nice local Store to meet the needs of creative people.
I also decided to post a picture of some of the fun items I was able to buy at their store. My favorite Designer Paper (Stella Rose), fun felt, MFT Stamps, dies, and a new punch system. This is just the beginning of items I want to purchase. It will be fun to have somewhere to shop that is local.
Wednesday, January 18, 2012
Two Paper Divas Valentine
Today I have made another valentine card using the Conversation Hearts in a Jar digital Stamp from Two Paper Divas.
I could play with this digital stamp all day long. I was inspired by my great-niece Madison for this card because she made a card with the container upside down and the hearts falling out of it. The card stock is Stampin Up Pool Party and Rose Red from Stampin Up. I used "Attic Boutique" designer paper from Stampin Up for the PTI doily die and spellbinder die. The sentiment is from Papertrey Ink. I used a few embellishments like twine, decorative button and pearls.
I just love using my copics to color in each heart. I colored a few in a second jar and cut them out to fall out of the jar.
I am working on a few other valentine projects. I hope to post soon.
Tuesday, January 10, 2012
Sketch Saturday - Week #189 Challenge
Today I have another valentine card that I think is so adorable. Over at Sketch Saturday they are having a sketch challenge that fit right in to what I wanted to make. This is Week #189 Challenge sponsored by The Paper Shelter. If you have not seen their digital stamps, you must visit their site.
Once I visited The Paper Shelter, I just had to have "Pepe Le Souris in Love". Isn't this mouse just as cute as can be? What I love about their images when you buy them is that they send you a colored image along with a blank image. I appreciate a little guidance when I am doing my coloring.
I used my copic markers to color in the image. The cardstock is Stampin Up Rose Red. I used Spellbinders Circle and Scalloped circle dies for the image. My friend Linda sent me some lovely swirls so I used the green which really added to this card. The sentiment was from G Studio.
What a fun challenge this was. Thanks to Sketch Saturday for another great challenge.
Monday, January 9, 2012
Valentine inspired by Two Paper Divas
Well I am on a roll with my Valentine cards. My husband asked me what I was going to do with all them. I told him I didn't know but I sure was having fun making them.
Today my cards are inspired by the "Conversation Hearts in a Jar" that is available at Two Paper Divas. I just love their Valentine images.
The first card I decided my theme would be the traditional pink and red. The copics I used for this card were R81, R83 & R85. I used the Spellbinder "Labels Two" for the pink. The red heart is a stampin up die that cuts and embosses at the same time. The heart border is from Taylored Expressions. The sentiment is a Hero Arts stamp that I have had for several years. Add some twine and some buttons and you have a cute card.
This next card is my favorite because I love the pastels. I added a little lace doily, a spellbinders heart, flower, ribbon and you have a very cute card.
Be sure and check out Two Paper Divas because this sure is a fun digital stamp to play with.
I have a few more valentine cards in the works so be sure and check back.
Sunday, January 8, 2012
Another Valentine Card
This is another valentine card that my SCS friend Oliva had sent me a while back. I always kept it thinking I would case it and make one just like it. I used Stampin Up embossed heart die, PTI rick rack die and Stampin Up leaf die. The grass is a punch I borrowed from my sister. Not sure where she got it. The sentiment is from Stampin Up called well scripted. I love the simplicity of this card yet it looks so elegant.
Saturday, January 7, 2012
Valentine Card
Everyone knows how I love hearts. That is why I love making valentine cards. Today I pulled out my bird punch from Stampin Up and used some red cardstock and you end up with a very cute valentine card. The heart border is from Taylored Expressions. I'm sure I will be using it alot more. So this is the first of many valentine cards I will be making.
Wednesday, January 4, 2012
Bookmarks
I received this darling bookmark and yummy chocolates from my SCS friend Imke from Germany. Be sure and check out her blog because she is very talented.
I am telling you that chocolate was the best. I always thought Germany had the best chocolate. I have been just having one piece a day to prolong it. Yummy.
Well Imke inspired me to make a few bookmarks for gifts. The stamp is from Papertrey Ink along with the bookmark die and scallop circle die. The paper is "Spice Cake" from Stampin Up. I just love the new Stampin Up color Pool Party. Any chance I get to use it I can.
I hope to post the card that Imke sent along with the chocolates and bookmark. It was beautiful.
Monday, January 2, 2012
Paper Fashions Etc Project
Today I start my journey on the Design Team for Paper Fashions Etc. I am excited to be part of this team because I feel it will challenge me to try new things. Paper Fashions Etc. is also locally owned and I am always happy to be part of our local community.
My project today is a tea bag holder. I always like having these around to give as little gifts.
I decided to use the mug from the Friends Forever stamp set. I printed the mug on white cardstock and colored in the mug, flower in the center and leaves. I also printed the mug on Stampin Up Designer Paper "Spice Cake" and then cut the top and bottom out and pieced on top of the mug. I also used the sentiment "Friendship begins with a cup of Kindness" and cut it out using my SU scallop oval punch.
I started with a piece of brown cardstock cut 3 1/4" x 9 3/4". I then scored it at 3 1/4" and 6 1/2" inches. I then cut down the center of one end to make my pocket for the teabag.
I then took a 3 inch square piece of designer paper and cut in half diagonally. I then used a decorative border punch for the edge.
I put some score tape along the bottom of the triangle piece to hold in the tea bag. I also added score tape along the back center for ribbon.
I then folded over the cut edge and added the decorative designer paper traingle.
For the outside of the holder, I added a 12 inch piece of ribbon and then placed a 3" x 3" square piece of designer paper that I had trimmed the corners on.
I then finalized the holder by placing the pieces on the front. I used some pop dots on the back of the mug to have it stand out. I also added some pearls on the corners for bling. I hope you enjoyed my first project for Paper Fashions Etc. Be sure and check out all the neat digital stamps that they have. I am finding that it is endless with digital images and what you can do with them. Be sure and check back next Tuesday because I will have another fun project.
My project today is a tea bag holder. I always like having these around to give as little gifts.
I decided to use the mug from the Friends Forever stamp set. I printed the mug on white cardstock and colored in the mug, flower in the center and leaves. I also printed the mug on Stampin Up Designer Paper "Spice Cake" and then cut the top and bottom out and pieced on top of the mug. I also used the sentiment "Friendship begins with a cup of Kindness" and cut it out using my SU scallop oval punch.
I started with a piece of brown cardstock cut 3 1/4" x 9 3/4". I then scored it at 3 1/4" and 6 1/2" inches. I then cut down the center of one end to make my pocket for the teabag.
I then took a 3 inch square piece of designer paper and cut in half diagonally. I then used a decorative border punch for the edge.
I put some score tape along the bottom of the triangle piece to hold in the tea bag. I also added score tape along the back center for ribbon.
I then folded over the cut edge and added the decorative designer paper traingle.
For the outside of the holder, I added a 12 inch piece of ribbon and then placed a 3" x 3" square piece of designer paper that I had trimmed the corners on.
I then finalized the holder by placing the pieces on the front. I used some pop dots on the back of the mug to have it stand out. I also added some pearls on the corners for bling. I hope you enjoyed my first project for Paper Fashions Etc. Be sure and check out all the neat digital stamps that they have. I am finding that it is endless with digital images and what you can do with them. Be sure and check back next Tuesday because I will have another fun project.
Subscribe to:
Posts (Atom)
Creative Crew
This month's theme for our Creative Crew group comes from Terry and her theme is Thanks Snow Much. What a fun theme but I hope this do...
-
Newtons Nook is one of my favorite stamp companies. It could be because of the many adorable kitty stamps. Their Inky Paws Ch...
-
Welcome to Prickley Pear CHA Release Hop Day 3! Remember that Prickley Pear Rubber Stamps is giving away two prizes valu...
-
I am still making a few Christmas cards. I never seem to have enough. I went to Newton's Nook Inky Paws Challenge for Inspiration. I...